Introduction
Documentation is simultaneously both one of the most
important parts of any application, and also one of the parts most
developers like doing the least. And while writing documentation is boring
and tedious, maintaining documentation is nothing short of
soul-destroying.
Nowhere is this more evident than with screen-shots. Integrating
screen-shots into documentation enormously enhances the quality of the
documentation, but at the same time taking screen shots is extra work, and
maintaining the screen-shots is often ignored. It is not uncommon to see
documentation with old screen-shots, or in many cases no screen-shots at
all.
Nor is this problem limited to technical documentation. It is well known
that web sites which include screen-shots encourage users far more than
sites which don't. But there again screen shots often lag behind the
actual product. Maintaining screen-shots is a time-consuming and painful
process.
While DrawShot cannot magically make writing documentation a pleasing
experience, it can at least assist in keeping that documentation up to
date, and specifically it can assist by keeping your screen-shots up to
date.
What DrawShot does is create screen-shots of your application as you
navigate through the application. Thus (when DrawShot mode is activated)
one, or more, screen shots are automatically created for you as you visit
the windows in your application. The names of the shots are consistent and
can be included as-is in documentation and web sites.
Features
DrawShot automatically creates a screen-shot of every
window as you navigate through your application.
If the window contains a SHEET control, with multiple tabs, then multiple
shots of the window will be created. Each shot will display with a
different tab taking the focus.
In addition to the above automatic shots you can create one or more
additional custom shots for each window. Custom shots can contain
annotations where you highlight a control and include a notation, or
reference to the control.
Custom shots and annotations can be defined at runtime thus allowing users
other than the developer to create the definitions for each screen-shot -
ideal for situations where the person responsible for the documentation is
not the person developing the code.
You can create a screen-shot of the procedure at any time and save to a
file by typing a Hot Key. This is Ctrl-S by default, but can be set by the
programmer.
A simple PrintScreen option can be added to windows as a HotKey or as a
button. This allows any user to Print a current window, or more
specifically every tab on the current window. This is especially useful
for Forms where users may want to capture the fields on a current form in
a report format. Naturally as a report the user can then make use of
alternative report destinations, like PDF or Email, if your program has
that facility.
Jump Start
Recent Lookups contains a number of different
functionalities, which can be added to your application independently of
each other. In other words you may choose to implement all the
functionalities, or just some of them This section explains briefly how to
get the functionality into your application.
1. Import Into Dictionary
Open your application dictionary, and import the
file Drawshot.dctx. This DCTX file is
located in your Clarion9\accessory\libsrc\win
folder. This should add two tables called DrawShotPics
and DrawShotControls to your dictionary.
You are welcome to adapt the table to your application, for example by
changing the File Driver, if you wish to do so. You may also need to
change the sizes of some fields if your file driver has key-length
limits. For a longer discussion on changing the tables see the section
entitled Dictionary Tables.
2. Add Global Extensions
Make sure the Draw global extension and StringTheory
global extensions are added to the application.
Add the DrawShot Global Extension to your application.
Click on the
Import DrawShot Procedures
button (if this is the Data DLL or single-app Exe) or the
Import EXTERNAL DrawShot Procedures button if this is part of a
multi-DLL set of apps, and this is not the Data DLL.
Set the following settings on the Global Extension;
- Files Tab - Fill in the various options there which link the
template to the tables you imported into your dictionary.
- Multi-DLL tab - If you are including this in a Multi-DLL app then
see the section Using in a Multi-DLL (multiple
app) system for more specific Multi-DLL instructions.
If you have a Multi-DLL system then add the global extension, to each of
the apps.
Running the Application in DrawShot mode
Apart from the PrintScreen (Ctrl P) and Save Screen
(Ctrl-S) functionalities which are available at any time, the automatic
creation of screen-shots is only created when the application is in
DrawShot Mode.
The easiest way to put the application into DrawShot mode is to run it
with a command line switch. The name of the switch is
drawshot, and the value is the destination for the images. For
example;
something.exe drawshot=c:\temp\myimages
In the above line the images will automatically be created in the
c:\temp\myimages
folder. Note that this folder must exist, DrawShot will NOT create the
folder.
You can easily automate a command line switch in your code using the
Clarion SETCOMMAND function. In the examples the applications are forced
into drawshot mode by the following line in the MAIN procedure.
SetCommand('drawshot=c:\temp')
Thus you are free to turn on, and turn off, DrawShot mode at any time
using this approach.
Dictionary Tables
DrawShot adds two tables to your dictionary.
DrawShotPics is a list of custom screenshots which will be created as the
documenter travels through the application.
DrawShotControls is a child of the DrawShotPics table. It contains one or
more annotations, and control highlights for the custom picture.
The names of the tables, keys and fields can be changed. The new name then
needs to be captured on the Files tab of the Global extension. the length
of string fields can be altered, but the TYPE of fields must not be
changed. (ie Strings must remain Strings, and Longs remain Longs and so
on.)
Procedures in the Application
DrawShot adds two procedures to your application.
These are named DrawShotPrintScreen and DrawShotAnnotate. The names can be
changed, but this leads to extra work so is not recommended. Both these
procedures contain a user interface, and hence having them as procedures
in the application allows you to adjust them to suit the rest of your
application.
DrawShotAnnotate
This is a procedure called when the user goes into
Annotate mode. It runs on a separate thread and allows the user to
create custom screen-shots an annotate them as they go. The procedure
can be called from the main menu, or using any other mechanism you
prefer.
Usually the procedure call is hidden from general users - only those
users actually creating documentation need to make this window appear.
DrawShotPrintScreen
This is a very simple Report procedure which takes a
DrawShot object as a parameter named
pShot.
From this object it has a queue of screen images to print.
This report can be customized to match the reports in your system. The
following properties of the object can be useful in this procedure;
| Property |
Use |
| pShot.PrintQueue |
A queue of the screenshots for calling procedure. |
| pShot.PrintQueue.Name |
The name of the file containing the screenshot. |
| pShot.Proc |
The name of the procedure which called the
DrawShotPrintScreen procedure. |
| pShot.PrintHeader |
A string field set by the caller to be used in the Report.
Can be useful for creating a report header string and so on. |
| pShot.PrintFooter |
A string field set by the caller to be used in the Report.
Can be useful for creating a report footer string and so on. |
User Features
DrawShot includes two features which are useful to
your end user. These features are on all the time, the user does NOT need
to put the app into
DrawShot mode in order to make
use of them.
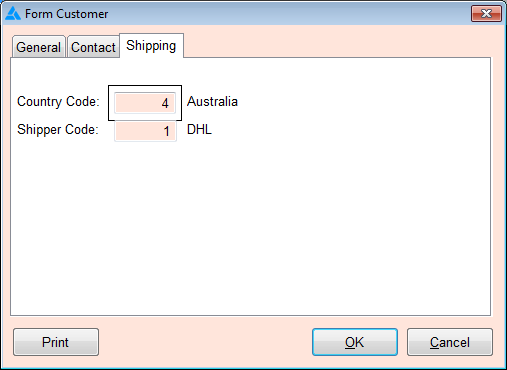
PrintScreen
The Print Screen feature can be triggered by either
a Hotkey (Ctrl-P by default), by the
PrintButton
Control Template button, or indeed using a single line of code
calling
ThisDrawShot.PrintScreen() , which
you could add onto the procedure wherever you like.
When the Print Screen feature is invoked, then a screen shot of the
window (along with all the tabs - if that option is on) is taken, and
all the images are sent to the
DrawShotPrintScreen procedure.
SaveScreen
The Save Screen feature can be triggered by the user
pressing the Save Screen hotkey (Ctrl-S by default). This takes a
snapshot of the screen as-is, and allows them to save that snapshot to a
file. The SaveScreen process can also be initiated by calling the ThisDrawShot.SaveScreen(filename) method.
Annotating a Window
When in
DrawShot mode, the
program will automatically create screen shots of all the windows, and all
tabs, as the user travels through the program. You can create additional
shots of the screens though, as well as add annotations to the screens,
using the Annotator.
To use the Annotator procedure (
DrawShotAnnotate)
the program must be in DrawShot mode. The annotator window is just a
procedure and can be opened whichever way you prefer - the examples use a
(sometimes hidden) menu item in the Help menu.
the annotator Window looks something like this;
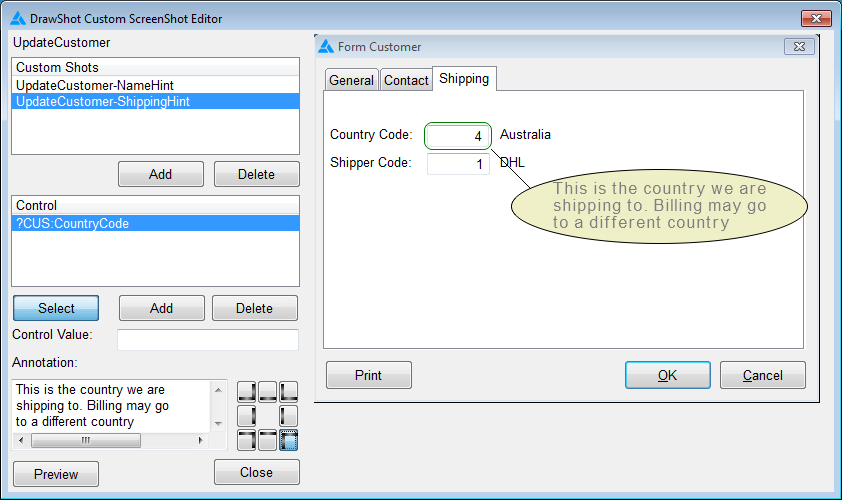
The controls on the left control the annotation, while the image on the
right is a preview of how the window will appear with the annotation on
it.
To create a new screenshot, with an annotation on it, follow these steps;
- First navigate to the window in the application that you want to
Annotate. You will see the name at the top of the controls change as
you navigate through the application.
- Click on the ADD button below the Custom Shots list. A random shot
name will be created. Use Edit-In-Place in the list to change the name
to something meaningful. Once set you probably don't want to change
the name again.
- Make sure the new shot is the one selected in the Custom Shots list
- Click on the ADD button under the controls list. A new entry will
appear with the text <not set>.
- Highlight this entry in the list, then click on the Select button.
This places the annotator in Select mode. The target window will get a
new background when in selection mode.
- On the target window select the control you want to highlight by
clicking on it with the mouse. You'll notice a border will surround
the selected control.
- When you have selected the control, press the SELECT button in the
annotator again to take it out of select mode.
- Enter the annotation you want in the text field provided. If the
preview does not appear automatically then click on the preview
button.
- Adjust the position of the annotation using the radio buttons
provided.
Customizing the Annotations
The annotations can be customized in a number of ways.
Most of the customization options are on the Global extension, on the
Styles tab. You can set the style of control highlighter, the style of the
text bubble, the various colors, as well as the font attributes. See the
template documentation for the Styles tab of
the global extension for more details.
Templates
Global Extension Template
General Tab
Disable All DrawShot Features
Tick this option on to disable all DrawShot generated code in the
application. Useful for debugging.
Import DrawShot Procedures
Press this button on your Data DLL, or single-app program. It will
import the two DrawShot procedures into the application for you. You
can then modify the procedures. If the procedures already exist then
this option will be disabled.
Import EXTERNAL DrawShot Procedures
Press this button in apps which are part of a Multi-DLL solution, but
where this is NOT the Data DLL. This imports the procedures into the
applications as EXTERNALs, which means the system is expecting to find
them exported from the Data DLL.
Options Tab
Keycode Lookup
This setting does nothing. It is provided so you can determine the
correct Clarion equate for a specific key combination. You can then
use this equate in one of the fields below.
Save Hotkey
If the user presses this key then a file dialog will appear, and they
can save the screen they are looking at. Note that this field is an
expression, you can manually enter a keycode, or you can use a system
setting or equate, or whatever.
Print Hotkey
If the user presses this key then all the automatic screen shots for
the window will be created, and sent to a report. Custom annotated
shots are not created when the user uses this hot key. In addition to
the hot key support you can add the PRINT button control template to
specific windows if you wish. Note that this field is an expression,
you can manually enter a keycode, or you can use a system setting or
equate, or whatever.
Print All Tabs
If this is on then the default behavior when the user presses the
PrintScreen key is for all windows will be to create a screenshot
where each tab in turn is visible. This can be overridden at the
procedure level (On or Off).
PrintScreen Proc
The name of the Report procedure which will be called when all the
screen shots have been created. This defaults to DrawShotPrintScreen
once the sample report has been imported.
Generate BMP's for Reports
Use this option in versions of Clarion which do not support PNG's on
reports.
Path for Temp Files
Use this to set the path where temporary images (used by the reports)
will be created. By default
c:\temp
fill be used.
Files Tab
This tab identifies the Tables, Keys and Fields in
the dictionary that are required by DrawShot. You can leave the Tables
on this tab blank and the default values will be used.
Styles Tab
Control Border Style
This is the shape of the highlighter which will be drawn around the
highlighted control. Select between Default, Box, Ellipse, Round Rect.
Control Border Color
This is the color of the Highlighter which will be drawn around the
highlighted control.
Bubble Style
This is the shape of the annotation "bubble" which will be placed on
the screenshot. Select from Default, Box, Ellipse or Round Rect.
Bubble Border Color
This is the color that will surround the annotation bubble.
Bubble Fill Color
This is the color that will fill the bubble. It is recommended that
you select a color here which is not used in your application. this
makes the annotations easier to see.
Font Settings
You can set all the font attributes here for the text that appears
inside the annotation bubble.
Multi-DLL Tab
This is part of a Multi-DLL Program
Tick this on if this application is a DLL or EXE which is part of a
multi-app suite of apps.
Export Classes from this DLL
Tick this on only if this is the data dll in a suite of apps.
Classes Tab
Class Version
An internal version number.
Local Extension Template
General Tab
Do not Generate This Object
If this is on then the DrawShot object will not be generated onto this
window.
Options Tab
Print all Tabs
Choose between Default (the Global option will be used), Yes and No.
This applies when the user presses the Print button, or the
PrintScreen hotkey.
Print Header
When the user does a PrintScreen (using CtrlP or whatever) the report
procedure is called. Before calling the report the .PrintHeader
property is populated with this expression. The .PrintHeader property
can then be used on the report.
Print Footer
When the user does a PrintScreen (using CtrlP or whatever) the report
procedure is called. Before calling the report the .PrintFooter
property is populated with this expression. The .PrintFooter property
can then be used on the report.
Classes Tab
Object Name
The name of the DrawShot object in this procedure. Defaults to
ThisDrawShot.
Class Name
The name of the DrawShot class to use. Defaults to DrawShot.
Print Button Control Template
The Print button provides a visual indication to the
user that the screen can be printed. The control template has no options
of it's own - the options on the Local extension are used.
Using in a Multi-DLL System
In your Data-DLL:
- Add the Global Extension template, go to the Multi DLL tab and tick
on both options;
This is part of a Multi-DLL program and
Export Classes from this DLL
In your other applications (that use DrawShot) - including DLL and EXE
apps:
- Add the Global Extension template, go to the Multi DLL tab and tick
on only the first option;
This is part of a Multi-DLL program
Make sure the second option is turned off.
Example
There are a number of examples that ship with
DrawShot;
- ABC
An example of using DrawShot in a single ABC Template based EXE
program
- Legacy
AAn example of using DrawShot in a single Clarion Template based EXE
program
- MultiDLLABC
An example of using DrawShot in an ABC program, comprising of a Data
DLL, an EXE and other DLL's.
- MultiDLLLegacy
An example of using DrawShot in a Clarion Template program, comprising
of a Data DLL, an EXE and other DLL's.
All the examples have code in the Frame procedure, that puts the app into
DrawShot mode and writes the images to c:\temp. In your own application
you would probably not have this code rather allowing the documentation
person to put the app in DrawShot mode only when they want to generate
new, or updated images.
Class Reference
DrawShot
The DrawShot class is derived from the Draw class,
and Implements the GUTS interface. It is added to each procedure in
the application (that has a window) by the Local Extension template.
It performs the task of taking the screen shots, and adding the
annotations etc.
Properties
| Property |
Type |
Description |
|
|
|
Methods
DrawShotFiles
The DrawShotFiles class is used by both the
DrawShot and DrawShotAnnotator classes. It links the various files,
keys and fields to the tables in the dictionary which are used to
store the custom screenshots and annotations.
Properties
| Property |
Type |
Description |
| DrawShotPics |
&FILE |
The DrawShotPics table in the dictionary. |
| PicsIdKey |
&KEY |
The PicId Key, which is the primary key for the
DrawShotPics table. This key contains the Pic ID field. |
| PicsProcKey |
&KEY |
The Proc Key in the DrawShotPics table. This key contains
the Proc field, and possible other fields as well. |
| PicsPicId |
&STRING |
The unique field for the DrawShotPics table. |
| PicsProc |
&STRING |
The name of the procedure to which the custom shot
belongs. |
| PicsName |
&STRING |
The name to save the pic shot as. (The location is set by
the drawshot command line switch.) |
| PicsClipListField |
&STRING |
Reserved for future use. |
| DrawShotControls |
&FILE |
A pointer to the DrawShotControls table in the dictionary. |
| ControlIdKey |
&KEY |
The primary key in the DrawShotControls table. This key
contains the ControlId field. |
| ControlPicKey |
&KEY |
The foreign key linking the DrawShotControls to the
DrawShotPics table. This key contains the PicId field. |
| ControlControlId |
&STRING |
The ControlId field in the DrawShotControls table. This is
the primary key field for this table. |
| ControlPicId |
&STRING |
The PicId field of the parent DrawShotPics record. There
can be multiple control records to each Pic record. |
| ControlControlList |
&STRING |
The list of the controls (; separated) of controls to
highlight. |
| ControlValue |
&STRING |
Reserved for future use. |
| ControlAnnotation |
&STRING |
The text to place in a "speech bubble" near the
highlighted controls. |
| ControlPosition |
&LONG |
the position of the speech bubble. This is an integer from
1 to 9, excluding 5, and matches the position of the numbers
on a computer numeric keypad. |
| RemoteProc |
&STRING |
The name of the procedure currently being annotated. |
| _PicsOpen |
LONG |
An internal flag tracking if the DrawShotPics table was
opened by the class. |
| _ControlsOpen |
LONG |
An internal flag tracking if the DrawShotControls table
was opened by the class. |
Methods
DrawShotAnnotator
The DrawShotAnnotator class is used in the
DrawShotAnnotate window. It provides the functionality required by
that window.
Properties
| Property |
Type |
Description |
| Files |
&DRAWSHOTFILES |
A pointer to the DrawShotFiles
class used by this object. |
| Guts |
&GUTS |
A pointer to the global GUTS object in the application |
| GutsId |
LONG |
The ID returned by the global GUTS object when registering
this object. |
| PreviewControl |
|
The FEQ of the Preview Image control on the Annotator
window. |
| PreviewPic |
STRING |
The name of the preview procedure, just created by the
DrawShot object, in the procedure being annotated. |
| RemoteGutsId |
LONG |
The GUTS Id of the application window currently being
annotated. |
| RemoteProc |
STRING |
The name of the procedure currently being annotated. |
| SelectedControl |
STRING |
A ; separated list of the controls selected on the window
being annotated. |
| Thread |
LONG |
The thread number this object is associated with. |
| _RemoteProc |
&STRING |
A pointer to a local variable on the Annotator window.
This allows the window to display the name of the procedure
currently being annotated. |
Methods
Frequently Asked Questions
Support
Your questions, comments and suggestions are
welcome. See our web page (
www.capesoft.com)
for new versions. You can also contact us in one of the following ways:
| CapeSoft Support |
| Email |
 |
| Telephone |
+27 87 828 0123 |
Installation
Run the supplied installation file.
Distribution
This product is supplied as source files that are
included in your application. There are no additional files for you to
add to your distribution.
However to create PNG files you will need to ship the PNG files supplied
by Draw; cs_libpng.DLL and Zlib.DLL.
License and Copyright
This template is copyright © 2025 by CapeSoft
Software. None of the included files may be distributed. Your programs
which use this product can be distributed without any royalties due on
this product.
Each developer needs his own license to use this product. (Need to
buy more licenses?)
This product is provided as-is. CapeSoft Software and CapeSoft
Electronics (collectively trading as CapeSoft), their employees and
dealers explicitly accept no liability for any loss or damages which may
occur from using this package. Use of this package constitutes agreement
with this license. This package is used entirely at your own risk.
Use of this product implies your acceptance of this, along with the
recognition of the copyright stated above. In no way will CapeSoft ,
their employees or affiliates be liable in any way for any damages or
business losses you may incur as a direct or indirect result of using
this product.
For the full EULA see
https://capesoft.com/eula.htmlVersion History
Version 1.13 (27 May 2025)
Version 1.12 (1 May 2024)
- Update: To match Draw DESTRUCT,VIRTUAL
- Internal: Update to Capexx.tpw version 4.32
Version 1.11 (24 May 2021)
Version 1.10 (22 September 2020)
- Fix: In some cases the call to ThisDrawShot.Init did not pass the
temporary image folder set on the global extension.
Version 1.09 (8 September 2020)
- Change: Derived From DrawClass, not Draw. Requires Draw Build
4.22. Required For Clarion 11.0.13622 .
Version 1.08 (18 September 2018)
- Add: Clarion 11 to install.
Version 1.07 (25 February 2015)
- Support for Clarion 10 install.
Version 1.06 (7 January 2015)
- Fix: Version 1.0 tested the wrong control property.
Version 1.05 (6 January 2015)
- Fix: If image control fails to CREATE then don't continue grabbing
and saving.
Version 1.04 (23 July 2014)
- Fix: Sending Event:Accepted to the Window (not a control) with no
Print Button set would trigger a PrintScreen.
Version 1.03 (11 July 2014)
- Add: HasToolBar property to object. (Better handles Sheet controls
in Toolbar.)
- Fix: Leftover Trace statements removed.
Version 1.02 (27 June 2014)
- Fix: Generated in some cases a spurious global object.
- Fix: Renamed internal group in template which was badly named.
Version 1.01 (27 January 2013)
- Clarion 9.1 compatible install
Version 1.00 (3 January 2013)